Content
- How do I find the invoices which still need to be sorted?
- How do I open the document sorting screen?
- The Document sorting screen
How do I find the invoices which still need to be sorted?
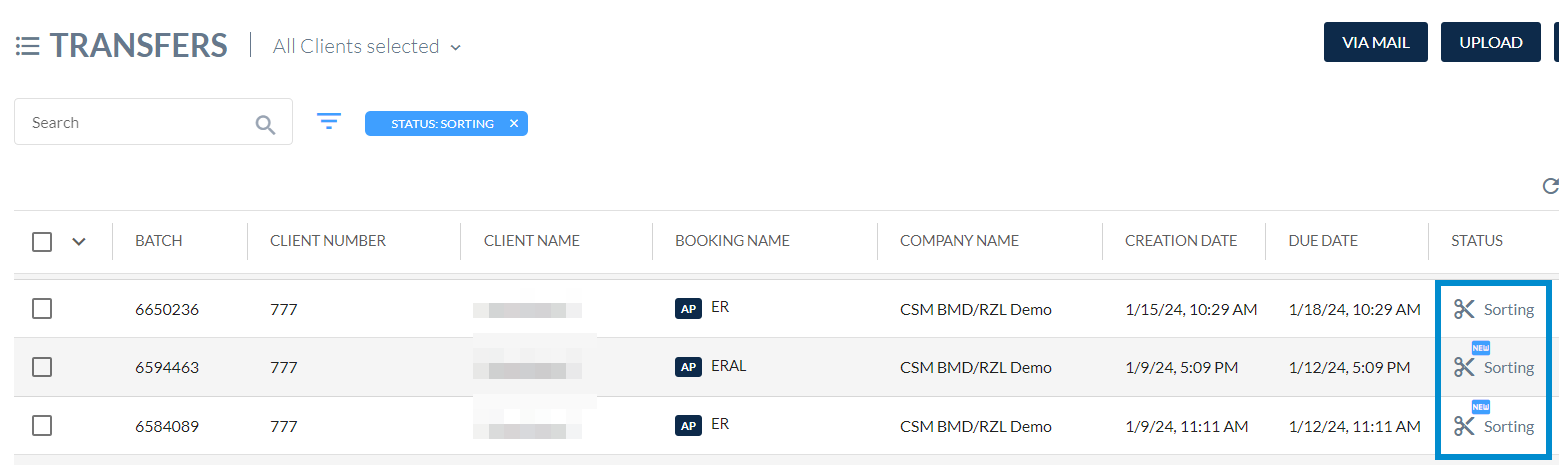
Invoice sorting takes place in the Transfers screen or Invoices screen. Here it is possible to filter by client and status. By setting the filter to "Sorting", only batches that have not yet been sorted are displayed.

After invoices have been uploaded, they are processed by the Finmatics software. The status in this case is "In work". This takes about 5-10 seconds per page. More information is available under How long does it take to process documents in Finmatics?.
As soon as the invoices have been processed, their status becomes "Sorting". The "NEW" label indicates that there are invoices which have not yet been processed by a person.
How do I open the document sorting screen?
As soon as the invoices have the "Sorting" status, you can check the stapling and correct it if necessary with just a few clicks. To do so, simply open the 3-point menu and click on "Sorting". Alternatively, this can be done by selecting one or more stacks of invoices and click on the scissors symbol.
If more than one stack of invoices has been selected, the next stack opens automatically after you confirm the sorting of one stack. This makes it easy to work through all batches quickly, and then confirm all changes made at once by clicking the double ticks.
The Document sorting screen
In the document sorting screen, invoices can be checked, rotated, recategorised into different types, or deleted if necessary, and the sorting can be corrected. If the invoices have been correctly sorted, clicking Confirm saves the changes. Clicking on the double ticks finalizes the invoices for further processing.

Sort or staple invoices
The grey bar between the pages indicates a separation between two pages. Clicking the red X between the invoice pages, removes the separation between two pages. Clicking the arrow symbol on the left of an invoice page inserts a separation.


The AI learns from corrections to sorting. With outgoing invoices in particular, it can happen that each page is separated during the first run, as there are no comparable transactions yet.
Enlarge invoices
Clicking the magnifying glass on an invoice enlarges it to to view it in more detail. Alternatively, the zoom slider at the top of the screen can be used to enlarge all the invoice pages.


Move/Rotate/Delete Documents/Undo Changes
The order of the invoice pages can be adjusted via Drag&Drop. If you select an invoice a tick is added and marked. Several invoices can also be selected at the same time by clicking on the small windows, and deselected by clicking them again. Selected invoices can be rotated in a circle by clicking on the arrow or deleted by clicking on the trash symbol. You can undo the last changes you made with the left arrow and repeat undone changes with the right arrow. If you want to undo all changes, you can do this with the clock symbol. Click on the recycle bin symbol to delete an invoice.

Recategorise Processes
You can also change the processes in the document sorting screen if it has not been correctly assigned/uploaded. To do this, you can either select the corresponding process directly on the lower left corner of the invoice image, or you can select one or more invoices and then use the pencil symbol to assign them all a new process at once.


How do I confirm the sorting of invoices?
Select the desired invoices and click on the double tick. Depending on the setting, the invoices then switch to either the Capture, Verify or Export status.
You can find more information on the different statuses in What do the different transfer statuses mean?.
